Google Analytics Setup Guide: 7 Steps to Get GA4 Running in 2026
If you have a website and you’re not tracking what’s happening on it — you’re basically flying blind.
No idea which pages are pulling in traffic. No clue where your visitors are coming from. Zero insight into what they’re doing before they leave. That’s the situation most beginners are in when they first start a blog or launch a business site. And it doesn’t have to be that way.
This Google Analytics setup guide walks you through every step of installing and configuring GA4 — from creating your first account to verifying your tracking code is actually working. Whether you’re a blogger just getting started or a small business owner who’s been putting this off for months, by the end of this guide you’ll have GA4 running, verified, and pulling in real data.
Let’s get into it.
What Is Google Analytics 4 and Why Should You Set It Up Today?
Google Analytics 4 — or GA4 — is Google’s free website analytics platform. It tracks what happens on your site: how people find you, which pages they read, how long they stay, and what actions they take.
But it’s more than just visitor counts. Done right, GA4 tells you which blog posts are driving email signups. Which landing pages convert. Which traffic sources are actually worth your time. Understanding what organic traffic is is critical because organic search often becomes one of the highest-converting and most sustainable traffic sources for a website.
Google sunsetted Universal Analytics (the old version) in July 2024. If you’re still seeing references to “UA” or “UA-XXXXXXXXX” tracking IDs anywhere online, that information is outdated. GA4 is the only game in town now.
GA4 vs Universal Analytics — What Actually Changed?
The biggest shift is the data model. Universal Analytics tracked sessions and pageviews. GA4 tracks events — every user interaction, from a page view to a button click to a scroll depth, is logged as an event. This makes GA4 far more flexible, though admittedly a little more confusing to set up for the first time.
A few other differences worth knowing:
- GA4 uses a single property for both web and app data (no more separate properties)
- Cross-device tracking is better by default
- Conversion tracking now works through “key events” (formerly called conversions)
- GA4 uses machine learning to fill in gaps where cookies are blocked
It’s a genuinely different product. Don’t try to map your Universal Analytics muscle memory onto it. Learn it fresh.
Who Needs to Set Up Google Analytics?
Pretty much anyone with a website that has goals. Bloggers who want to grow traffic. E-commerce store owners tracking sales. Service businesses measuring inquiry form submissions. Even if you’re brand new and getting 50 visitors a month — set it up now. The data you collect today becomes valuable context six months from now when you’re trying to figure out what’s working.f you’re just getting started with SEO and website growth, check out our Beginner SEO Guide for a complete roadmap to keyword research, on-page optimization, and organic traffic growth.
Before You Start — What You Actually Need
You need three things:
- A Google account (Gmail works fine)
- A website you can edit — meaning you can add code or install plugins
- 10–30 minutes of focused time
That’s genuinely it for a basic setup.
Do You Need Google Tag Manager for GA4?
Short answer: not necessarily, but probably yes eventually.
For a simple blog where you just want traffic data, you can install GA4 directly without Google Tag Manager. If you plan to track form submissions, button clicks, e-commerce purchases, or scroll depth — Google Tag Manager makes all of that dramatically easier to manage.
My recommendation? Set up GA4 directly first to understand how it works. Then, once you’re comfortable, consider migrating to Google Tag Manager for more advanced GA4 tracking setup. The deeper GTM setup is covered later in this guide.
Step 1 — Create a Google Analytics Account
Head to analytics.google.com and sign in with your Google account.
Click Start measuring. You’ll be prompted to create an account.
Account name: This is typically your business or website name. You can manage multiple websites under one Google Analytics account, so keep the account name broad (e.g., “My Business” rather than “My Blog Homepage 2026”).
Under Account Data Sharing Settings, you’ll see checkboxes for sharing your data with Google. These are on by default. Read through them — most people leave them checked, but it’s worth knowing what you’re agreeing to.
Click Next.
Account vs Property vs Data Stream — Understanding the Structure
Here’s where a lot of beginners get confused, so let me clear it up:
- Account = The top-level container. Think of it as your company.
- Property = A specific website or app you want to track. One account can have multiple properties.
- Data Stream = The source of data for a property. For a website, this is your web data stream.
Most small website owners will have: 1 account → 1 property → 1 data stream.
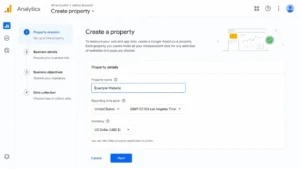
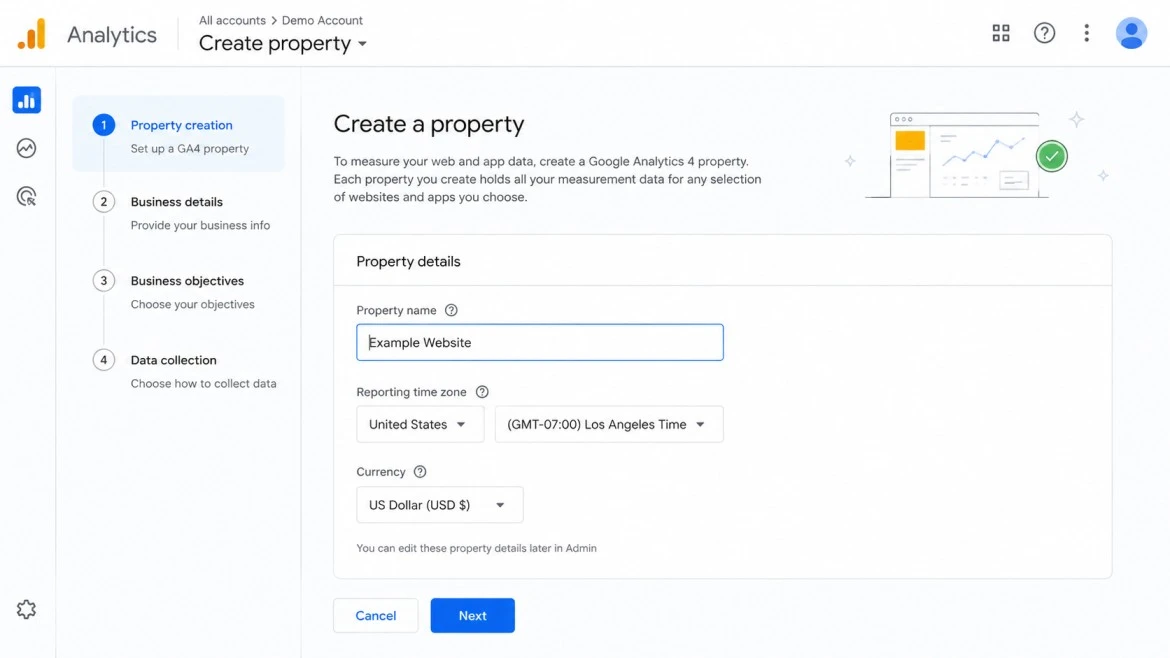
Step 2 — Set Up a GA4 Property
After naming your account, you’ll be asked to set up a property.
Property name: Use your website name (e.g., “Anobee Blog”).
Reporting time zone: Choose your local time zone. This affects how days are counted in your reports — get this wrong and your daily stats will look off.
Currency: Choose the currency you operate in. Especially important if you’re tracking revenue.
Click Next, then fill out the quick business details form (industry, business size). These questions inform the default reports Google sets up for you — they don’t affect your tracking.
On the next screen, select your business objective. For most bloggers and content sites: Get baseline reports is the right pick. E-commerce sites should choose Drive online sales.
Click Create and accept the terms of service.
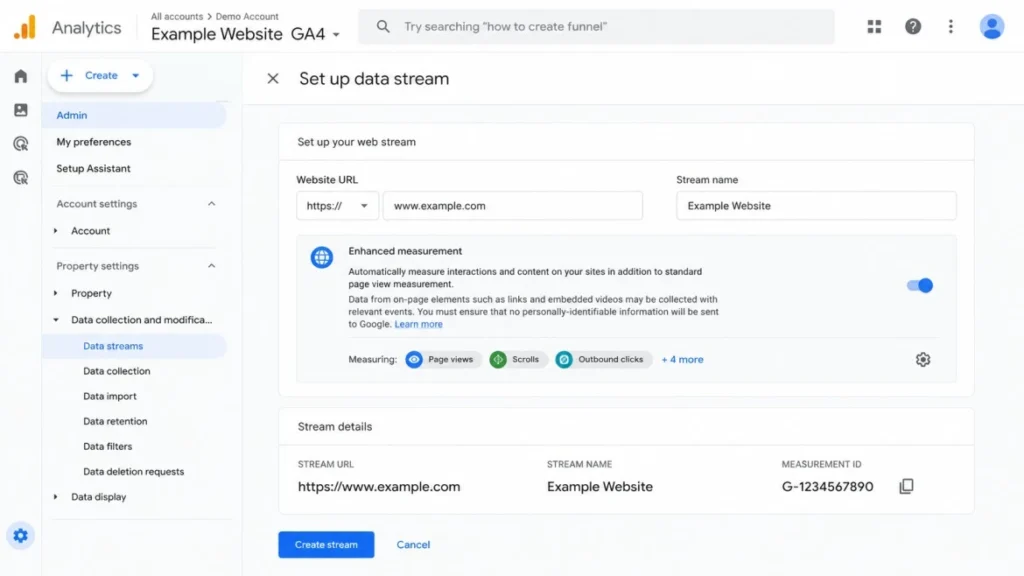
Step 3 — Add Your GA4 Tracking Code to Your Website
This is where your actual GA4 installation happens.
After creating your property, GA4 will prompt you to set up a data stream. Select Web, then enter your website URL and stream name.
You’ll land on the web stream details page. At the top, you’ll see your Measurement ID — it looks like G-XXXXXXXXXX. Copy it. You’ll need it.
Scroll down to see your Google tag (gtag.js) — a snippet of JavaScript code. This is what you add to your site.
Installing GA4 on WordPress (Without a Plugin)
If you’re comfortable with a small amount of code editing:
- In your WordPress dashboard, go to Appearance → Theme File Editor
- Open header.php
- Find the
</head>closing tag - Paste your entire GA4 tag snippet above that closing tag
- Save changes
Done. Your GA4 tracking code is now on every page of your site.
Warning: If you update your theme, this edit may be overwritten. Use a child theme, or better yet, use a plugin.
Installing GA4 on WordPress With a Plugin
This is what I’d recommend for most beginners. Two solid options:
Site Kit by Google — Free, official Google plugin. Handles GA4 connection and shows basic stats right inside your WordPress dashboard. Simple to set up, no code required.
MonsterInsights — More polished UI, better for e-commerce. The free version covers basic GA4 tracking; the pro version adds e-commerce tracking and form tracking.
For Site Kit:
- Install and activate from the WordPress plugin directory
- Click Start Setup
- Sign in with your Google account
- Grant permissions and connect your GA4 property
- Done
Installing GA4 via Google Tag Manager
Skip ahead to the dedicated GTM section later in this guide if you want the full GTM walkthrough. The short version:
- Create a GA4 Configuration tag in GTM
- Set the Measurement ID to your
G-XXXXXXXXXXID - Set the trigger to All Pages
- Publish your container
Step 4 — Verify Your GA4 Installation Is Working
Don’t skip this. Plenty of people install GA4, assume it’s working, and only realize months later that it was broken the whole time.
Method 1: Realtime Report
In GA4, go to Reports → Realtime. Open your website in a new tab. Within 30–60 seconds, you should see yourself appear as an active user.
Method 2: DebugView
DebugView is more powerful. In your GA4 property:
- Go to Admin → DebugView
- Install the Google Analytics Debugger Chrome extension
- Enable it and reload your site
- Watch events fire in real time in DebugView
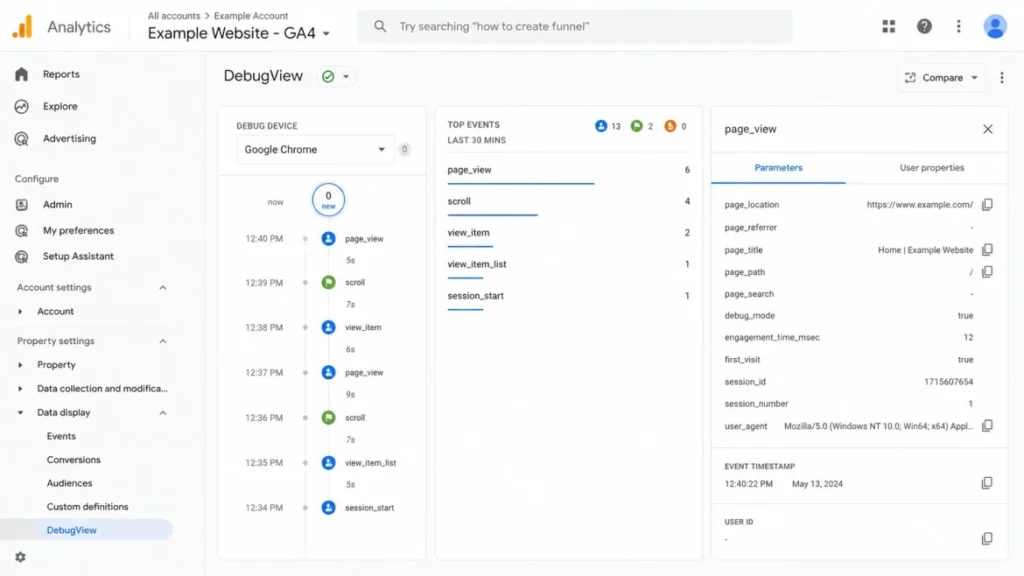
DebugView shows you every event as it happens — page_view, scroll, session_start — so you can confirm the tag is firing correctly before trusting your data.
Step 5 — Configure Google Analytics 4 for Better Data
This is where most guides stop. Just install the code and you’re done, right?
Not quite. Out of the box, GA4 collects data — but it’s not optimized. A few configuration steps will make your data much more reliable and useful.
Enable Enhanced Measurement (and What Each Toggle Does)
In your data stream settings, Enhanced Measurement is on by default. It auto-tracks a handful of useful events without requiring any additional code:
| Event | What It Tracks |
|---|---|
| Page views | Every page load |
| Scrolls | When a user reaches 90% of a page |
| Outbound clicks | Clicks on external links |
| Site search | Internal search queries |
| Video engagement | YouTube embeds |
| File downloads | PDFs, ZIPs, etc. |
Leave most of these on. The exception: if your site uses a hash-based navigation (common in some JavaScript frameworks), the Page changes based on browser history events toggle can create duplicate pageviews. Turn it off if your page count looks inflated.
Set Up Internal Traffic Filters
Here’s something almost every beginner misses: your own visits are being counted in your data.
Every time you browse your own site, GA4 logs it. Over time this can meaningfully distort your traffic numbers, especially on smaller sites.
Fix it:
- Go to Admin → Data Streams → [Your Stream] → Configure Tag Settings
- Click Define internal traffic
- Add a rule: IP address equals [your IP address]
- Then go to Admin → Data Filters and set the internal traffic filter to Active
Find your IP by searching “what is my IP” on Google. While you’re optimizing your analytics setup, it’s also worth reviewing a comprehensive technical SEO checklist to make sure your site is properly crawled, indexed, and performing at its best.
Connect GA4 to Google Search Console
This is genuinely one of the most useful things you can do early on. Linking GA4 to Google Search Console pulls your organic search query data directly into GA4 — so you can see which keywords are driving clicks and how those sessions behave on your site.
- In GA4: Admin → Property Settings → Search Console Links
- Click Link and select your Search Console property
- Choose your web data stream
- Confirm
Once linked, you’ll get a Search Console section under Reports → Acquisition showing queries, clicks, impressions, and CTR. This data is incredibly useful for SEO analysis because it helps you understand which keywords are driving visibility and traffic. If you’re new to the platform, follow this Google Search Console setup guide for beginners to connect your site and start monitoring search performance.
Step 6 — Set Up GA4 Conversion Tracking
This is where GA4 starts earning its keep.
Conversions (now called “key events” in the GA4 interface) are the actions that matter most on your site. Form submissions. Newsletter signups. Button clicks. Purchases. Without tracking these, you’re measuring traffic but not impact.
What Counts as a Conversion in GA4?
Anything that represents meaningful user intent:
- Contact form submission
- Email opt-in
- Product purchase
- Free trial signup
- PDF download
- Video play (if content is a core offering)
- Phone number click
How to Mark Key Events as Conversions
GA4 already auto-tracks several events via Enhanced Measurement. To mark an existing event as a key event:
- Go to Reports → Engagement → Events
- Find the event you want to mark (e.g.,
generate_lead) - Click on the event name
- Toggle Mark as key event to on
For custom events (like a specific form submission), you’ll need to either:
- Set up a custom event in GA4 using the Create event feature (Admin → Events), or
- Trigger a custom event via Google Tag Manager (more reliable, recommended for anything complex)
Pro tip: Set up a thank-you page for form submissions (e.g., /thank-you) and track page_view events on that URL as a conversion. It’s one of the most reliable ways to track form submissions without needing custom code. If you’re still configuring your analytics property, follow this Google Analytics 4 setup guide to ensure conversions, events, and reporting are configured correctly from the start.
Step 7 — Link GA4 to Google Ads and Other Google Products
If you’re running Google Ads — or plan to — linking it to GA4 is not optional.
In GA4: Admin → Google Ads Links → Link
Select your Google Ads account and confirm.
Why Linking Matters for Remarketing and Attribution
Once linked, you can:
- Import GA4 key events directly into Google Ads as conversions
- Create audience lists in GA4 and use them for remarketing in Google Ads
- See Google Ads campaign performance inside GA4 (not just clicks, but what those clicks do)
- Use GA4 data for smarter bidding strategies (Target ROAS, Target CPA)
The attribution modeling difference alone is worth doing. GA4 uses data-driven attribution by default — meaning credit for conversions is distributed across the entire customer journey, not just the last click. This gives you a much more accurate picture of which campaigns are actually working.
Common GA4 Setup Mistakes (That Most Guides Ignore)
After helping dozens of sites with their analytics, I keep seeing the same mistakes. Here they are:
1. Not filtering your own traffic. Covered above, but worth repeating — your visits will skew your bounce rate, session duration, and event counts.
2. Using the wrong time zone. A mismatch between your server time and GA4 time zone causes data to fall in the wrong day. Set it correctly on day one.
3. Not linking Search Console. You’re leaving half your SEO data on the table.
4. Confusing “sessions” and “users”. In GA4, a user can have multiple sessions. A session ends after 30 minutes of inactivity. Check you’re looking at the right metric for what you’re measuring.
5. Marking too many events as conversions. If everything is a conversion, nothing is. Be selective. Track 3–5 genuinely meaningful actions. This becomes especially important when you’re measuring revenue-generating activities and evaluating your blog monetization strategy, where accurate conversion data helps identify what is actually driving income.
6. Assuming the plugin handles everything. Plugins like Site Kit install the base GA4 tracking tag — they don’t configure conversion tracking, internal traffic filters, or Search Console linking for you.
7. Not checking DebugView after installation. Silent failures happen. Always verify.
Google Tag Manager GA4 Setup — A Deeper Look
If you decided to go the GTM route (smart choice for scalability), here’s exactly how to do it.
First: if GTM isn’t on your site yet, go to tagmanager.google.com, create an account, and add the GTM container snippet to your site — one snippet goes in the <head>, one goes immediately after the <body> tag.
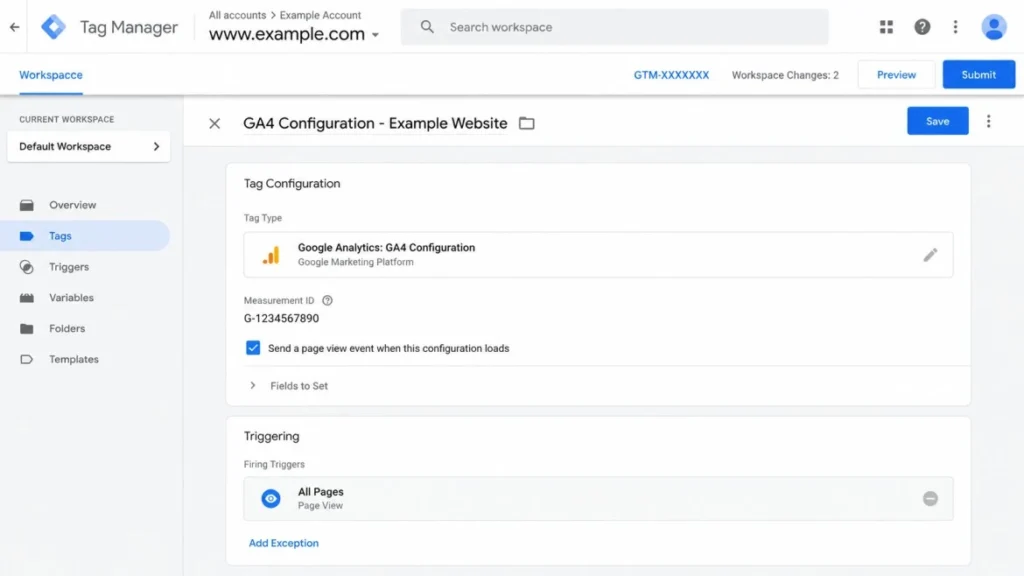
Creating a GA4 Configuration Tag in GTM
- In GTM, go to Tags → New
- Click Tag Configuration → Google Tag
- Enter your Measurement ID (
G-XXXXXXXXXX) - Under Triggering, select All Pages
- Name the tag (e.g., “GA4 – Configuration”) and click Save
This tag fires on every page load and establishes your GA4 session. Think of it as the foundation — all your other GA4 event tags will reference this.
Testing and Publishing Your GTM Container
Never publish without testing. In GTM:
- Click Preview (top right)
- Enter your website URL and click Connect
- GTM Tag Assistant will open and show every tag firing on your site
- Confirm your GA4 Configuration tag fires on All Pages
- Check DebugView in GA4 to confirm events are coming through
- Back in GTM: Submit → Publish
That’s it. Any future event tracking (form submissions, button clicks, scroll depth) can now be added as new tags in GTM without touching your site’s code. If you’re new to the platform, follow this Google Tag Manager setup guide to learn how to install GTM correctly and manage tracking tags more efficiently.
GA4 Setup for Beginners — Your First 30 Days Checklist
Once your GA4 installation is done, here’s what to do in the first month:
Week 1
- Confirm tracking code is firing (DebugView / Realtime)
- Set up internal traffic filter
- Link Google Search Console
- Identify 3–5 key conversions to track
Week 2
- Set up conversion events for your most important user actions
- Explore the Reports → Acquisition section to understand traffic sources
- Check Reports → Engagement → Pages and screens for top content
Week 3
- Review your top landing pages — are bounce rates sensible?
- Check geographic data (where is your audience?)
- Review device breakdown (mobile vs desktop)
Week 4
- Set up your first Exploration report (funnel, path, or free form)
- Create a simple dashboard in the Reports section
- Decide if you need Google Tag Manager for anything you’re not currently tracking
Frequently Asked Questions About Google Analytics Setup
How long does it take to set up Google Analytics 4?
Basic setup takes 15–30 minutes. Full configuration with conversion tracking and GTM integration: 1–2 hours.
Is Google Analytics 4 free?
Yes, completely free for standard use. Google Analytics 360 (enterprise tier) is paid, but the free version covers everything most websites need.
Do I need Google Tag Manager to set up GA4?
No. You can install GA4 directly. GTM becomes valuable when you need to track specific events or conversions without editing code repeatedly.
How do I check if GA4 is working?
Use DebugView (Admin → DebugView) while browsing your site, or check the Realtime report.
What is a Measurement ID in GA4?
Your unique data stream identifier, formatted as G-XXXXXXXXXX. It’s what connects your website to your GA4 property.
Can I use GA4 on multiple websites?
Yes. You can create multiple properties under one Google Analytics account, each with its own data stream.
How do I set up GA4 on WordPress?
Use Site Kit by Google (easiest), MonsterInsights, or add the tracking code manually to your theme’s header.php.
What Comes Next
You’ve got GA4 installed, verified, and configured. That’s genuinely more than most website owners ever do.
But the setup is just the beginning. The real value of a Google Analytics setup guide isn’t in the installation — it’s in what you do with the data once it starts flowing. Which pages are your actual performers? Which traffic sources convert? Which pieces of content keep people on your site for 4 minutes, and which ones lose visitors in 15 seconds?
Start looking at your reports weekly. Not obsessively — but regularly enough that you notice trends before they become problems, and spot wins before they’re old news.
One challenge for you: within the next 7 days, identify one action on your site that you want more of — a form fill, a click, a page visit — and set it up as a GA4 conversion. Measure it for a month. Then make one change to improve it.
That’s it. That’s the whole discipline. Analytics without action is just data tourism. Use it.