Image Optimization for SEO: 10 Proven Techniques for 2026
Quick Answer: Image optimization for SEO means reducing image file sizes, choosing efficient formats like WebP or AVIF, writing descriptive alt text and filenames, and adding responsive markup — so pages load faster, rank better in Google Images, and improve Core Web Vitals scores like LCP.
If you’ve ever run a page through PageSpeed Insights and watched the score drop the moment images load, you already know the problem. Images are usually the heaviest assets on a page, and they’re also one of the easiest things to fix once you know which levers actually matter. This guide walks through ten techniques, in order, that take an image from “slowing your site down” to “helping it rank” — covering format selection, compression targets, markup attributes, WordPress/RankMath settings, schema, and the AI search angle that most existing guides skip entirely.
Table of Contents
Why Image Optimization Matters for SEO and Core Web Vitals
Image optimization matters because it sits at the intersection of three things Google cares about directly: page speed, page experience, and image search visibility. An unoptimized hero image can single-handedly push a page’s Largest Contentful Paint (LCP) from “good” into “needs improvement,” and that’s a metric Google uses as a ranking signal.
How Images Affect LCP, CLS, and Page Speed
LCP measures how long it takes for the largest visible element — often a hero image or header banner — to render. A 4MB unoptimized JPEG can take seconds to download on mobile, dragging LCP well past the 2.5-second “good” threshold. Cumulative Layout Shift (CLS), the second Core Web Vital most images touch, spikes when an <img> tag has no width and height (or aspect-ratio) defined: the browser doesn’t reserve space for the image, so text jumps around as it loads in.
Key Insight: A single unoptimized hero image without dimensions set is one of the most common single causes of both a poor LCP score and a poor CLS score on the same page.
The Business Impact: Rankings, Conversions, and Google Images Traffic
Faster pages correlate with lower bounce rates and better conversion rates, both trackable through your GA4 setup. What’s changed is the visibility surface. Properly marked-up images can appear in Google Images, Google Lens results, and increasingly in AI Overviews that pull multimodal content. A blog that treats images as an afterthought is leaving an entire traffic channel on the table, separate from the page-speed benefit. Treating image optimization as a recurring habit, not a one-time project, is what compounds these gains across dozens of posts.
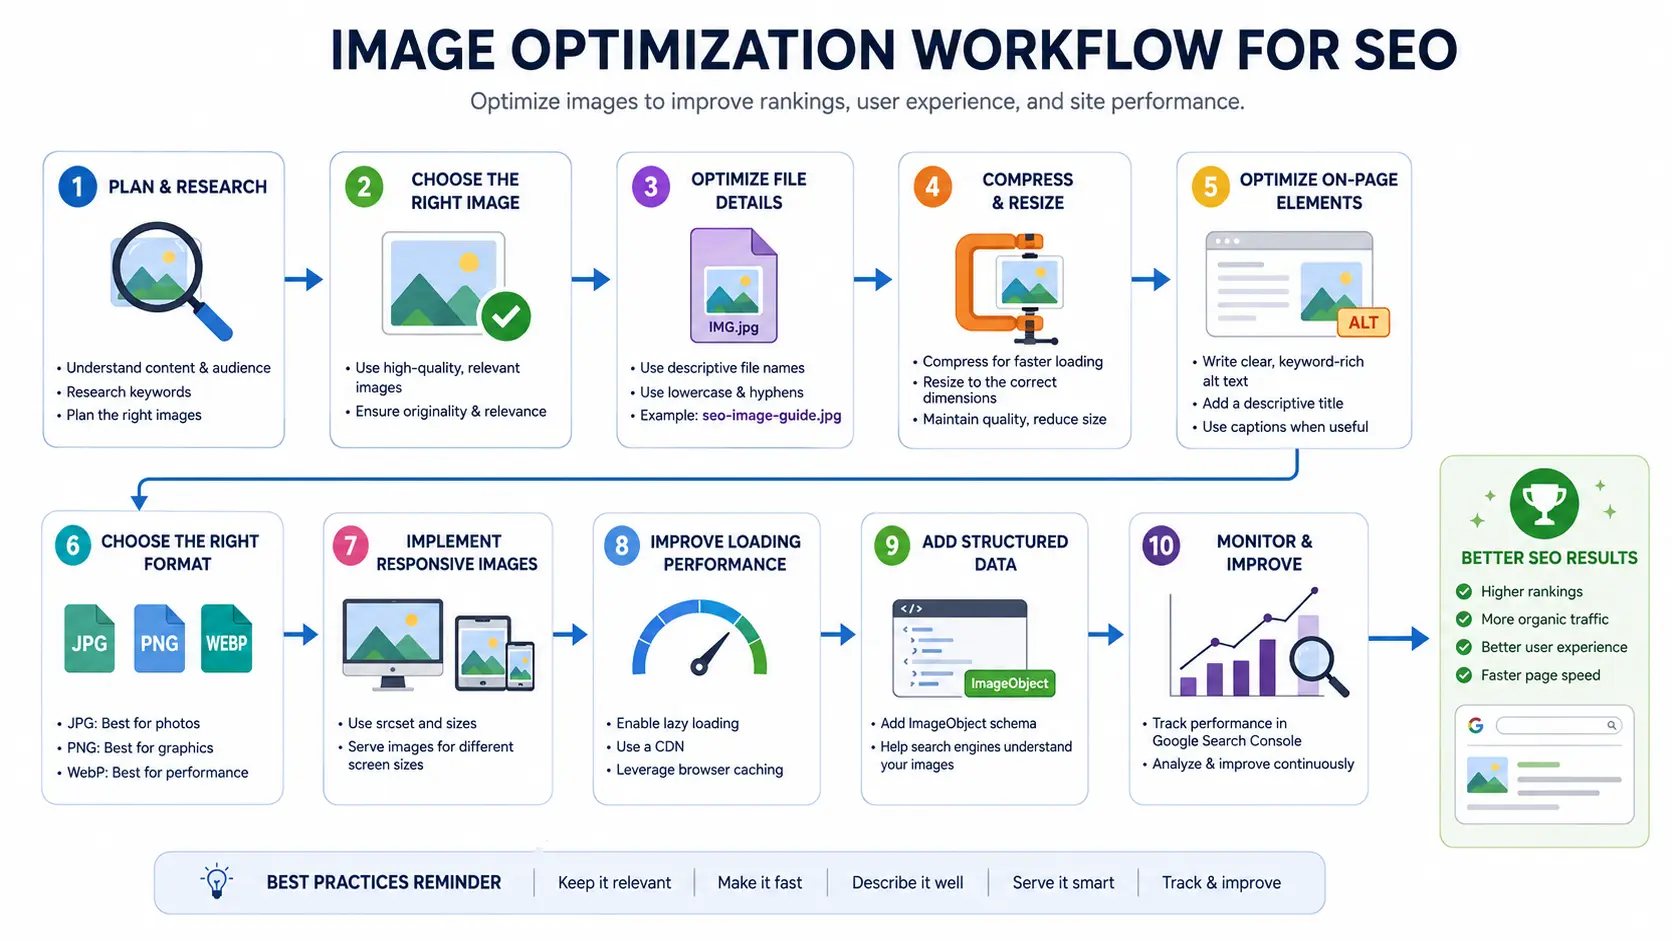
The SHARP Framework: A 5-Step Image Optimization Workflow
Most image optimization advice reads as a list of disconnected tips. The SHARP Framework turns it into a repeatable workflow you can run on every image before it goes live.
- S — Scan & Audit: Identify oversized, missing-alt, or wrongly-formatted images using PageSpeed Insights or Lighthouse before changing anything.
- H — Harmonize Formats: Standardize on WebP (with AVIF where supported) using a
<picture>element with a JPEG/PNG fallback. - A — Adjust Dimensions & Compression: Resize to the largest displayed size and compress to the file-size target for that image’s role (thumbnail, content, or hero) — usually the most time-consuming part of image optimization, but also the highest-impact.
- R — Reinforce with Markup: Add
width,height,srcset,sizes,loading,fetchpriority, anddecodingattributes. - P — Power Up with Schema & Metadata: Add ImageObject/Article schema and, where relevant, IPTC metadata, closing out the image optimization workflow with machine-readable signals.
Key Insight: The SHARP Framework treats image optimization as a five-step pipeline — Scan, Harmonize, Adjust, Reinforce, Power up — so nothing gets skipped between uploading an image and publishing the page.
Technique 1: Audit Your Current Images First
Before compressing or converting anything, run your page through PageSpeed Insights or Lighthouse and look specifically at the “Improve image delivery” and “Properly size images” opportunities. These reports tell you the exact files, their current size, and the potential savings in kilobytes — which means you fix the worst offenders first instead of guessing.
For an existing blog with hundreds of posts, prioritize by traffic: audit your top 20 landing pages by organic sessions first, since that’s where speed improvements translate most directly into ranking and conversion impact.
Key Insight: An image audit isn’t optional prep work in image optimization — it’s the step that tells you whether your real problem is format, compression, dimensions, or markup, so you don’t waste time optimizing the wrong thing.
Technique 2: Choose the Right Image Format (WebP, AVIF, JPEG, PNG, SVG)
The right format depends on what the image contains and trade for file size — a decision that shapes your image optimization strategy for the whole site.
WebP vs JPEG vs AVIF vs JPEG XL: Which Should You Use in 2026?
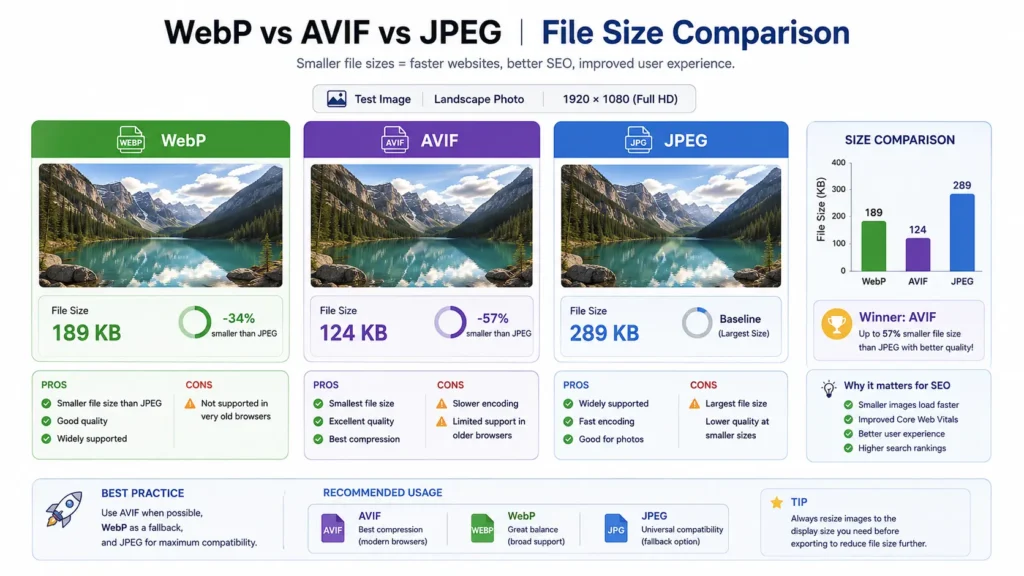
| Format | Browser Support | Best For | 2026 Note |
|---|---|---|---|
| WebP | ~97% | Default for photos and graphics | Safe default for nearly every site |
| AVIF | ~92% | Photos where max compression matters | Smaller files than WebP, slightly less support |
| JPEG | 100% | Fallback for photos | Use only as the final fallback in a <picture> element |
| PNG | 100% | Graphics needing transparency | Convert to WebP where possible |
| SVG | 100% | Icons, logos, illustrations | Already tiny — no conversion needed |
| JPEG XL | Not yet in stable browsers | Future-proofing | Chrome reversed its 2022 removal in Nov 2025 and is rebuilding support, but it’s not production-ready |
The practical pattern is a <picture> element that offers AVIF first, WebP second, and a JPEG fallback last — the browser picks the first format it supports:
html
<picture>
  <source srcset="hero.avif" type="image/avif">
  <source srcset="hero.webp" type="image/webp">
  <img src="hero.jpg" alt="Descriptive alt text" width="1200" height="630" fetchpriority="high">
</picture>
Key Insight: JPEG XL’s return to Chrome (announced November 2025) is worth tracking, but in 2026 your production format strategy should still be WebP-first with AVIF as a progressive enhancement — not JPEG XL.
Technique 3: Compress Images Without Losing Quality
Compression is the second pillar of image optimization. It isn’t about finding the smallest possible file — it’s about hitting a size target for the image’s role on the page without visible quality loss. A quality setting of 75–85 in WebP is, in most cases, visually indistinguishable from the source while cutting file size dramatically.
File Size Targets by Image Type
| Image Category | Target | Warning Threshold | Critical Threshold |
|---|---|---|---|
| Thumbnails | Under 50KB | Over 100KB | Over 200KB |
| Content images (in-article) | Under 100KB | Over 200KB | Over 500KB |
| Hero / banner images | Under 200KB | Over 300KB | Over 700KB |
Tools like Squoosh (browser-based, free) and TinyPNG handle one-off compression well. For a WordPress blog publishing regularly, a plugin like ShortPixel or Smush automates this on upload, so you’re not manually compressing every image.
Key Insight: A content image sitting at 800KB isn’t “a bit heavy” — it’s 4 to 8 times over the recommended threshold, and that gap is almost always recoverable without any visible quality difference.
Technique 4: Write SEO-Friendly File Names and Alt Text
Filenames and alt text are the two places where text and images meet in image optimization, and Google leans on both to understand what an image shows.
Filenames: Use lowercase, hyphenated, descriptive names. blue-ceramic-coffee-mug.webp tells Google (and you, six months later) what the file is. IMG_4821.webp tells nobody anything.
Alt text: Aim for 10–125 characters that describe the image’s content and context — not a list of keywords.
- Good: “Blue ceramic coffee mug on a wooden table”
- Bad: “mug coffee mug blue mug buy mug”
- Bad: “image123.jpg”
For ecommerce product images, this same naming convention should match your product title for consistency.
Alt text isn’t a general ranking signal for text search, but it’s a documented Google Images best practice, it’s required for accessibility, and it gives AI systems another data point when summarizing page content.
Key Insight: Treat alt text as a one-sentence caption written for someone who can’t see the image — if it reads naturally to a person, it almost always reads well to Google too. That’s the human-first standard image optimization should always meet.
Technique 5: Implement Responsive Images with srcset and sizes
Serving one large image to every device — phone, tablet, and desktop — means mobile users download far more data than they need. Fixing this is one of the highest-impact image optimization steps for mobile rankings. The srcset and sizes attributes let the browser pick the right file for its screen:
html
<img
  src="product-800.webp"
  srcset="product-400.webp 400w, product-800.webp 800w, product-1200.webp 1200w"
  sizes="(max-width: 600px) 400px, (max-width: 1200px) 800px, 1200px"
  alt="Blue ceramic coffee mug on a wooden table"
  width="800" height="800"
>
This is most impactful on hero images and product photos, where the difference between a 400px mobile render and a 1200px desktop render can be hundreds of kilobytes.
Key Insight: Without srcset, a mobile visitor downloads the exact same multi-hundred-kilobyte image as a 4K desktop monitor — responsive markup is one of the highest-leverage, lowest-effort fixes available.
Technique 6: Use Lazy Loading the Right Way (and When Not To)
Native lazy loading — loading="lazy" — tells the browser to skip downloading an image until the user scrolls near it. For a long blog post with a dozen in-content images, this can meaningfully cut initial page weight — one of the easiest image optimization wins to implement.
The rule that trips people up: never lazy-load your LCP image (usually the hero/featured image). Lazy-loading it delays the very element Google is timing for LCP, which can make your score worse, not better.
html
<!-- Hero image (above the fold) -->
<img src="hero.webp" alt="Hero description" width="1200" height="630" fetchpriority="high">

<!-- In-content image (below the fold) -->
<img src="diagram.webp" alt="Diagram description" width="800" height="500" loading="lazy" decoding="async">
Key Insight: Lazy loading is a below-the-fold tool only — applied to your hero image, the same attribute that’s supposed to help performance can directly damage your LCP score.
Technique 7: Add fetchpriority and decoding Attributes
Two smaller attributes round out your image optimization markup and compound the gains from formats and compression:
fetchpriority="high"on your LCP image tells the browser to prioritize that download in the network queue, ahead of other assets competing for bandwidth.decoding="async"on non-critical images tells the browser it can decode the image off the main thread, so it doesn’t block rendering of the rest of the page.
Neither attribute changes file size — they change when the browser does the work, which is exactly the kind of “free” optimization that’s easy to skip because it doesn’t show up in a file manager.
Key Insight: fetchpriority and decoding cost zero file size but directly influence the timing Google measures for LCP — they’re the cheapest wins in this entire guide.
Technique 8: Optimize Images for WordPress and RankMath
For a WordPress site running RankMath, this image optimization workflow maps onto specific settings:
- Upload compressed, correctly-formatted images — handle conversion/compression before or during upload via a plugin (ShortPixel, Smush), not after.
- Set alt text in the Media Library or block editor’s image block — RankMath will flag missing alt text on pages targeting a focus keyword.
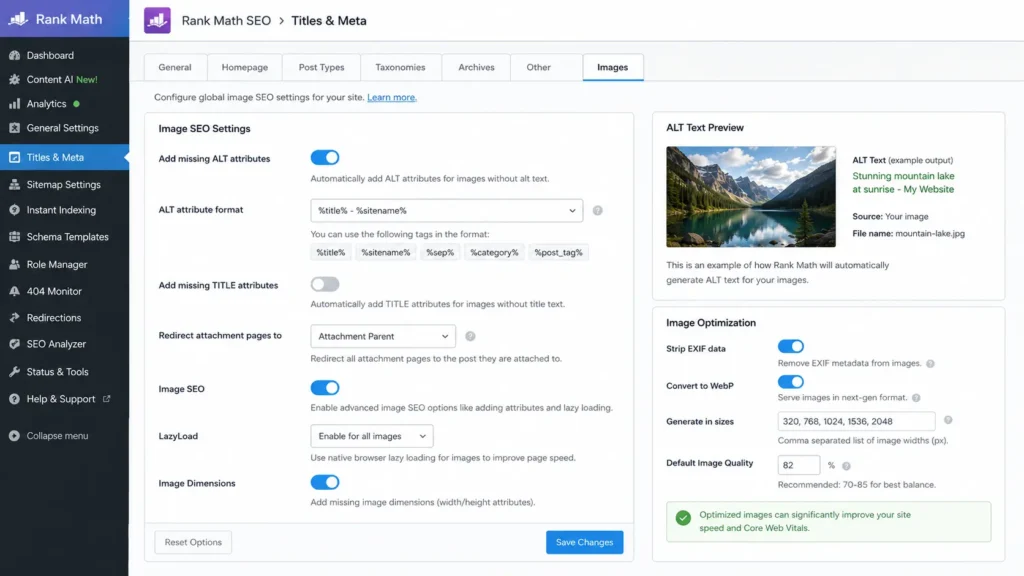
- Use RankMath’s image SEO checks in the content analysis panel, which flag whether the focus keyword appears in at least one image’s alt text or filename.
- Set a featured image for every post — RankMath uses this for the Open Graph (
og:image) tag, which controls how the post appears when shared. - Enable an image XML sitemap (RankMath’s sitemap module includes images by default) so Google can discover images independent of crawling the page itself.
Key Insight: RankMath’s content analysis will tell you if a focus keyword is missing from an image’s alt text — but it won’t tell you if your hero image is 4MB and lazy-loaded, which is why the audit step (Technique 1) still has to happen outside the plugin.
Technique 9: Add Image Schema and Structured Data (the Right Way)
Image optimization extends into structured data, and this is where a lot of older advice leads sites astray. Two corrections matter for 2026:
- HowTo schema lost its rich-result display in Google Search in September 2023. Adding it to an image-optimization tutorial no longer produces a visual SERP feature — the step-by-step structure can still help AI systems parse instructions, but don’t expect a rich snippet.
- FAQ schema was restricted to government and healthcare authority sites in August 2023. For a blog post, FAQ schema won’t generate the rich result it used to — a clearly formatted, visible FAQ section is still valuable for readers and AI citation, just not for the FAQ rich snippet itself.
What still works: ImageObject schema (nested inside Article/BlogPosting schema) can specify the image URL, license, and creator — details that can surface in Google Images results. Article schema with a correctly set image property remains active and recommended.
Pairing this with consistent entity naming across linked pages — see our internal linking strategy guide — strengthens how search engines connect this page to the rest of the site.
Key Insight: If your current schema setup leans on HowTo or FAQ markup for rich results, that’s a freshness gap worth fixing — both lost their visual SERP features years ago, and ImageObject/Article schema is where the remaining value sits.
Technique 10: Optimize for Google Images, Google Lens, and AI Overviews
Image optimization isn’t only about speed — three things determine whether an image gets indexed and surfaced by Google Images: standard <img> (or <picture>) elements (Google doesn’t index CSS background images), descriptive surrounding text and alt text, and discoverability via an image sitemap. Google Lens and multimodal AI search lean on the same signals – there’s no separate “Lens optimization” track.
For AI Overviews specifically, the connection is indirect but real: pages that load fast, have clear structure, and pair images with descriptive captions are easier for AI systems to parse as multimodal content, which research shows increases selection rates for AI-generated answers.
A practical example of this whole chain in action: a typical blog post with a 3.5MB hero photo, four 1.2MB in-content photos straight from a phone camera, and no width/height attributes set will often score “Poor” on mobile LCP and show a visible CLS jump as those images pop in. Running the same five images through the SHARP Framework — converting to WebP, resizing to display dimensions, and adding the markup from Techniques 5–7 — typically takes the hero image from 3.5MB to under 200KB and each content image from 1.2MB to under 100KB, without a visible quality difference. That’s a page-weight reduction of roughly 90% from images alone, which is usually enough on its own to move LCP from “Poor” into “Good.”
Key Insight: There’s no separate checklist for “Google Lens SEO” — the same fundamentals (standard HTML elements, descriptive alt text, image sitemap, fast loading) that work for Google Images also feed Lens and AI Overview multimodal results.
Common Image SEO Mistakes (and How to Fix Them)
Here are the most common image optimization mistakes and how to fix each one:
- Skipping image optimization and uploading camera-original files (3–8MB) directly. Fix: compress and convert to WebP/AVIF before upload.
- Missing width/height attributes. Fix: always set explicit dimensions or use
aspect-ratioin CSS to prevent CLS. - Lazy-loading the hero image. Fix: remove
loading="lazy"from above-the-fold images; addfetchpriority="high"instead. - Generic filenames and alt text. Fix: rename files descriptively before upload and write one-sentence, content-specific alt text.
- Relying on HowTo/FAQ schema for rich results. Fix: keep the visible structure for readers and AI, but don’t expect a SERP rich result from either schema type on a standard blog.
- No responsive markup on large images. Fix: add
srcset/sizesor a<picture>element with multiple resolutions. - Serving the same image to every breakpoint. Fix: generate at least three width variants (e.g., 400w/800w/1200w) so mobile users aren’t downloading desktop-sized files.
- Skipping the audit step entirely. Fix: before touching any image, run PageSpeed Insights once so the SHARP Framework’s “Scan” step has real data to work from instead of guesswork.
Image Optimization Checklist
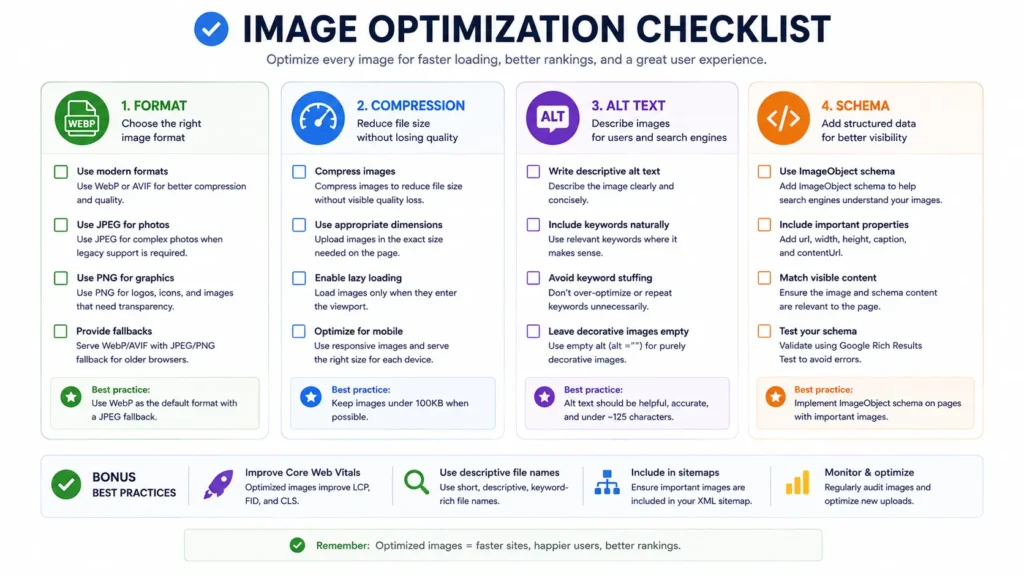
Treat this as the image-specific slice of your on-page SEO checklist — run through it before hitting publish.
- Completed an image optimization audit with PageSpeed Insights / Lighthouse
- Converted images to WebP (AVIF where supported) with a fallback
- Compressed to the size target for the image’s role (thumbnail/content/hero)
- Renamed files descriptively (lowercase, hyphenated)
- Written 10–125 character descriptive alt text for every image
- Added
widthandheight(or CSSaspect-ratio) to every<img> - Added
srcset/sizesfor large or hero images - Applied
loading="lazy"to below-fold images only - Applied
fetchpriority="high"and skipped lazy-loading on the LCP image - Added
decoding="async"to non-critical images - Set a featured image with alt text for
og:image - Confirmed ImageObject/Article schema includes the correct image URL
- Verified image XML sitemap is enabled and submitted in Search Console
FAQs About Image Optimization for SEO
What is image optimization? Image optimization is the process of reducing an image’s file size and selecting the right format, dimensions, and HTML markup so it loads quickly while staying visually clear.
Does image compression affect SEO? Yes, indirectly — smaller files reduce page weight and improve Core Web Vitals like LCP, which factor into Google’s page experience signals.
Is WebP better than JPEG for SEO? WebP files are typically smaller than equivalent-quality JPEGs with support across roughly 97% of browsers, making it the safer default for most sites in 2026.
What image size is best for websites? For image optimization purposes, aim for under 50KB for thumbnails, under 100KB for in-content images, and under 200KB for hero/banner images, sized to match their largest display dimensions.
Does alt text improve rankings? In image optimization, alt text isn’t a direct ranking factor for text queries, but it’s a documented Google Images best practice and required for accessibility.
What are next-gen image formats? WebP and AVIF are today’s next-gen formats with strong support; JPEG XL is returning to Chrome but isn’t yet practical for production.
What is lazy loading? Lazy loading defers downloading below-the-fold images via loading="lazy", reducing initial page weight — but it should never be applied to the LCP image.
Does image optimization affect Core Web Vitals? Yes — image weight and loading strategy heavily influence LCP, and missing dimensions are a leading cause of CLS.
Which image optimization tools are best? Squoosh and TinyPNG for manual compression, ShortPixel or Smush for WordPress automation, and PageSpeed Insights/Lighthouse for measuring results.
Should I use FAQ or HowTo schema on an image SEO article? Both lost their rich-result eligibility for standard blogs (FAQ in Aug 2023, HowTo in Sept 2023) — keep the visible structure for readers and AI parsing, but rely on Article and ImageObject schema for any remaining structured-data value.
22. Proprietary Framework
The SHARP Framework™
| Step | Name | What It Covers | Output |
|---|---|---|---|
| S | Scan & Audit | Run PageSpeed Insights/Lighthouse to find oversized, missing-alt, or wrong-format images | Prioritized list of images to fix, ranked by KB savings |
| H | Harmonize Formats | Standardize on WebP, layer AVIF as progressive enhancement, JPEG/PNG as fallback only | A consistent <picture> pattern used site-wide |
| A | Adjust Dimensions & Compression | Resize to display dimensions; compress to role-based KB targets (thumbnail/content/hero) | Files matching the size-target table |
| R | Reinforce with Markup | Add width, height, srcset, sizes, loading, fetchpriority, decoding | CLS-safe, performance-tuned <img>/<picture> markup |
| P | Power Up with Schema & Metadata | Add ImageObject/Article schema; IPTC labeling for AI-generated images where relevant | Structured data that supports Google Images and AI citation |
The framework is designed to run per image, before publishing — not as a one-time site audit. Each new featured image or in-content image passes through all five steps in order.
23. Entity Ecosystem
Core chain: Image Optimization → Core Web Vitals → LCP → Page Speed → User Experience → Rankings
- Image Optimization → Core Web Vitals: File size, format, and loading attributes are the direct inputs Google measures when scoring LCP and CLS.
- Core Web Vitals → Page Speed: LCP, CLS, and INP are Google’s quantified definition of “fast” — image work is one of the few areas where a single change can move all three.
- Page Speed → User Experience: Faster-loading pages reduce bounce and increase time-on-page, which feeds back into engagement signals.
- User Experience → Rankings: Page experience signals are part of Google’s ranking systems, closing the loop back to image-level decisions.
Secondary chains:
- Alt Text → Accessibility → Google Images → AI Overviews: the same alt text serves screen readers, Google Images indexing, and AI multimodal summarization simultaneously.
- Image Format (WebP/AVIF) → Browser Rendering → CDN Delivery: format choice determines how a CDN can serve and cache variants efficiently.
- Structured Data (ImageObject) → Knowledge Graph → AI Citation: schema gives search engines and AI systems machine-readable confirmation of what an image represents and who created it.
Search engines use these chains to connect a single technical decision (e.g., adding fetchpriority="high") to a business outcome (e.g., ranking improvement) — which is why image optimization shouldn’t be treated as a standalone “speed task” separate from SEO strategy.
24. Expert Insight
- The single highest-leverage image fix on most blogs isn’t compression — it’s removing
loading="lazy"from the hero image. - Alt text written for a screen reader and alt text written for Google Images are the same alt text; there’s no separate version to write.
- A file-size threshold table is more useful to a writer than a percentage target, because writers think in “is this image too big” terms, not ratios.
- FAQ and HowTo schema are two of the most over-recommended schema types in SEO content published after 2023.
- JPEG XL’s return to Chrome is a 2027 production-planning consideration, not a 2026 decision.
25. Research Notes
- WebP files are typically 25–35% smaller than equivalent-quality JPEGs, with browser support around 97%.
- AVIF offers stronger compression than WebP but reaches roughly 92% browser support, making it a progressive enhancement rather than a default.
- FAQ schema rich results have been restricted to government and healthcare authority sites since August 2023.
- HowTo schema rich results were removed from Google Search entirely in September 2023.
- Google Merchant Center requires IPTC
DigitalSourceTypemetadata labeling AI-generated product images asTrainedAlgorithmicMedia.